Hi, I have been working on level creation tools, so far we can create levels but we also needed to be able to create custom 'mission' files to have custom spray can placements, player spawning and death warps.
So I have created a second add-on for Blender which exports and compiles the mission data and added a collection with the mission stuff in the Blender sample scene file.
I have also updated the Stage Exporter blender add-on with improvements/fixes and also added an option "Visual as Collision" so that the Visual models are used as Collision models in case you're just working with the physics materials so you don't need to copy and paste the Visual models into the Collision every time you add new meshes and want to export, just check the box "Visual as Collision" and the exporter will automatically use the Visual meshes as Collision.
In the previous linked file you will find the blender scene file, add-ons and tools used to compile the level, see this post for how to setup the Stage exporter in Blender.
For the mission exporter, there's a blender add-on to install and it's panel will appear in the Scene Properties panel, same as the stage exporter:
You will need to setup the Stage export path (same as in the stage exporter settings), the game's Media directory and finally the JSRF_Mission_Compiler.exe tool provided in the Stage creation tools v1
Now for how it works, you will find a "Mission" collection in the outliner that contains various items for the mission data.
Inside, the 'PlayerSpawnPosition' is just a model of Beat that is where the player will appear in the level.
The 'Items' collection contains the spray cans, just duplicate them and keep the same name (+ ending with some number) to place more cans.
Finally the 'Death Warps' that are the areas where if you cross the plane you will be teleported back to the spawn location, for which you want to have a 'dw_plane' and a 'dw_spawn' with the same name and ending with an underscore and a number such as "dw_plane_0" "dw_spawn_0" "dw_plane_1" "dw_plane_2" etc
When you click "Export Mission" the mission data will be exported to the Stage Export path and the mission will be compiled, it saves the mission file as the tutorial mission, so to load the custom mission and level simply go to "New Game" in JSRF's main menu.
Hey there, small update for the Graffiti Tool, I have added a setting for the Cxbx app folder, so the cache(changes) gets automatically cleared when modding graffitis.
If you already have some mods installed (without this tool) make a backup copy of your Media folder so your mods don't get lost.
The configuration should be pretty straigth forward, just go to the settings tab, choose the platform (PC - cxbx) or (Xbox)
Then select the folder of the JSRF Media folder, and also a copy of the original game files in another Media folder (so original files can be restored when uninstalling mods) And finally the cxbx app folder, or the xbox FTP settings.
For now mod submissions are closed, and you need to contact me if you want to be granted access to upload mods, if you wish to do so, contact me on Discord: neodos#5090
Let me know in the comments if you have any questions or issues with the app.
Hey, so for the past few months I have been working on the JSRF level compiler and also an add-on for Blender to export levels for JSRF, also the latest version of the JSRF Mod Tool processes and compiles the data into the game's level file format and boom! custom levels.
Once again huge thanks to Gurten, Daft, Demo, Fuse, Duck
from the JSRF Reverse Engineering community & the Cxbx team who made this possible.
This post is an overview of the process, however I will not be covering the topic of the 3D modelling process since it would be too long to cover, it's a subject on it's own and there's already plenty of tutorials out there for Blender, the focus of this post is on how the JSRF levels work and the tools to create them.
In this zip file you will find a Blender scene file with a test level, the dev textures for the collision materials, the Blender JSRF Stage Exporter addon an the JSRF ModTool which compiles the level data exported from Blender, and lastly a Mission file which loads when you select "new game", the level will be empty, only corn is standing around, place this file in the "Media\Mission\" folder.
You can find the source code for the JSRF ModTool here
Composition of a JSRF level
A JSRF level is mainly composed of 3D models, of two kinds, one for the visuals that we see and uses textures (top left picture), and another, invisible in-game which is used for the physics simulation(top right pic) and how the player controller interacts with the environment's surfaces.
On the left the visual models, on the right the physics collision model, notice how the collision model has less detail, it's simplified, for instance the stairs become a flat ramp but in the game the yellow surfaces act as stairs and the character takes steps as if there were stairs. The colors on the surfaces of the physics models help us recognize what type of physics material the faces of the model are assigned.
Lastly, the level also contains curves data for the rails we can grind in-game.
Setting up the Blender JSRF Stage Exporter
First
let's install the JSRF Exporter addon for Blender, make sure you have
downloaded the files, and have "JSRF_Stage_Exporter.py"
In Blender go to Edit >> Preferences >> Add-ons then click Install
Browse to and select "JSRF_Stage_exporter.py" and don't forget to tick the checkbox(highlighted in red here) to enable the add-on:
You can the find the JSRF Stage exporter menu at the bottom of the 'Scene' panel:
You will first need to setup the paths as follows:
Stage ID is the name of the stage it will be exported as in the Media\Stage\ directory
Stage Export Path is the folder where the Stage data will be exported
Media Directory should point to the JSRF Media folder
ModTool filepath should point to the JSRF_ModTool.exe
When
you press Export Stage, the stage data from blender will be exported,
then the JSRF ModTool will run and compile the stage (by default) as the Garage
(stg00)
Creating the visual model & using it as a base for the collision
When we start to make a level, we're not going to work on the fancy visuals, instead we roughly model the shape of the level and objects, assigning the physics materials as the default material/texture for the visual models since that's what we're going to use as temporary collision models.
So you'll want to assign the materials that come with the demo scene.
Here's what a test stage looks like:
This is just a test map but that's all you need to know to get started making and testing levels for JSRF, if you're going to do the proper visuals. You might want to use the old mod tool (download top right) to extract the game's models and textures to re-use them.
Here's what the scene in Blender should look like:
The main "Stage" collection contains "Visual" "Collision" and "GrindPaths", and the those three collections should contain other collections that contain the meshes, and curves for the GrindPaths collection, check how the demo scene is setup if you're not sure.
You must use this structure and naming (except for "Model_group_0" you can name those whatever you like) as that's how the JSRF Stage Exporter addon can process and export the level data.
As for collision models, you can have up to 1023 triangles per collision model group, that's just how the game engine works.
When you have blocked out your level's visual meshes(with the collision materials), as a shortcut you can copy paste the model groups from Visual collection into the Collision collection. For a finished level the collision models should be modeled separately or you can use part of the visual models as a base, but the models should be simplified as much as possible, for instance, for a set of buildings as collision model, you wouldn't have multiple buildings/boxes for collision, but simply a big wall joining the ground with more or less the same scale as the buildings, in some cases it can be boxes or skewed shapes, in general just try to simplify as much as possible.
The textures must be in .png format and their resolution must be square and of power of two (i.e: 128x128 or 256x256 or 512x512) the minimum resolution is 8x8 pixels, maximum 2048 (untested), generally recommend sticking to 512x512 as the maximum.
Limitations of JSRF's levels visual models
JSRF Level Visual models only support one UV per vertex, which means you have to treat the model so there aren't multiple UVs per vertex and you need to be very mindful about it, otherwise if you make a complex mesh and once compiled you see it in-game with messed up UVs, it might be tricky(in Blender) to find which part of the mesh is causing the issue.
Ok here's an example (the box in orange) of the issue and how it's solved:
Grind Paths
Grind paths can be created by extracting the edges of a mesh as curves, you then need to add them on the "GrindPaths" collection, inside it's own collection/group.
Also once you're done editing the grind path, make sure to do this for the curve objects: Object >> Apply >> All transforms Not ideal, but for now that'll be necessary.
To extract edges as a curve, you can use the following addon, note: in the script change the version from "blender": (2, 80, 0), to whatever version of Blender you're using so it loads up. In blender you'll find the button while in Edit mode (edges) right click and at the bottom "Edges to curve"
Note: right now bezier or other types of curves are not supported, or at least I don't know Blender well enough to tell you which type of curves the exporter would support, so try starting from extracting edges as a curve with the add-on I just mentioned, unless you know a way to manually make "curves" that are just point to point without smoothing.
Hey there, I am still working on the tools to create JSRF levels (nearly done) but I also have to prepare a tutorial, in the meantime here are some video tutorials on how to mod JSRF textures and models, thanks to YayoDeLaRiva and Lkymn for making these tutorials:
About a year ago I was trying to make custom levels for JSRF, I was able to build brand new visual models for the levels and compile the physics collision models too, but there was a part of the collision data I could not figure out, that needed to be calculated, and since it wasn't, in the new level, you'd just fall through the floor and clip through everything. So I sought help from others but we couldn't figure it out, at least not how we were trying, through binary/hexadecimal/statistical analysis.
His reverse engineer method is through disassembly, which means de-compiling the game's executable/program file aka turning the program's executable binary file into a (massive and convoluted) list of CPU instructions, then analyzing CPU instructions/functions to see how the game loads the files and how it processes the data, easier said than done though.
This technique definitely was the only way to reverse engineer this bit of data about the physics collision 3D meshes of JSRF and people who have the (dis)assembly reverse engineering skills, are hard to come by and they usually have better things to do, luckily Gurten was willing to take the time and help, and he did an amazing job.
Anyways here's the result of the first properly compiled JSRF level:
I may or may not make a blog post later on about the process of
how I tried to reverse engineering the level collision data(and failed)
+ with other people, and finally how Gurten went about it and
succeeded, but it'd be a pretty long blog post.
I didn't publish the second blog post part about "how I reverse engineered JSRF" because it quickly got too technical, long and would be boring and pedantic to the reader. Perhaps
I'll make a video with audio commentary and graphic animations explaining the reverse engineering process, the mod tool, and how
it evolved over a decade.
Video format with audio would definitely be a
more dynamic, concise and a fun format to watch rather than reading a
long blog post, but again, it would be a lot of work creating such video,
so we'll see.
For now, there's some more work to do on the tool and things to figure out about JSRF, on compiling levels, and also creating a level creator/editor
tool to make it more accessible to create levels for JSRF.
Hey there, I have still been working on the JSRF tool, mostly reverse engineering and experimenting recompiling levels(aka 'Stage') data, such features are not accessible in the tool's interface yet, if you're a developer and want to try it, it's all in the code.
While we're close to being able to create custom levels, we're stuck on figuring out part of the level collision 3D mesh data.
I have managed to recompile a custom visual mesh for the level, as well as part of the collision mesh data, but since part of the collision mesh is still unknown/not understood and has to be calculated, right now we just fall/go through the collision mesh.
In the following video, it's a new compiled visual mesh, while maintaining the original Garage's collision meshes:
This post is also about the JSRF Tool 2.7, where I have fixed MDLB model
importing, before, adding or removing material groups in the model(MDLB)
importing interface, would corrupt the materials groups, giving wrong
materials to the model.
It's finally fixed, if you're a developer
and have been using/modifying the source yourself, I recommend checking
out the GitHub repository where I might update the code, while I don't
make blog posts about it: https://github.com/neodoso/JSRF_ModTool, otherwise here's the tool with the fixes:
Hi there, I thought I would share the wonderful www.jsrfspeedruns.com website made by people from the jsrf speedrunning and modding scene, they put a lot of effort into documenting all sorts of details about the game and they also created a complete guide to speedrunning JSRF with all the techniques, tricks, bugs, so if you're interested in upping your game on JSRF, trying speedruning or even just learn more about JSRF, www.jsrfspeedruns.com is the place to go.
I am making the JSRF ModTool open source, I wanted to do this for a while but wasn't very confident about my code, either way its best to put it out there once and for all. If you're a programmer and are interested in modifying the tool for personal use, or contributing, I am all for it, I am also all ears if you have feedback on my coding, bad practices etc I would love to hear it so I can improve.
Hi there, here's how we can swap player models by almost any model, in this case we're going to take a non playable "enemy" model and paste it into a "player" (.dat) file. First let's choose which model we're going to take, for instance go to the "Enemy" folder and open Armed.dat, then inside NORM[3] and select the first MDLB.
Under the dark grey bar with text "Armed.dat"click the "copy" button, now what is selected is copied to the clipboard memory. Now on the list of folders and file(on the left) go to the "Player" folder and select the Beat.dat file. Thenselect the first MDLB as in the following image:
Then click "paste"
We've pasted the MDLB from Armed.dat into a Beat.dat's MDLB.
You'll notice we also need to replace the texture, but first we're going to make some parts of the Beat model, invisible, such as the head and hands models, because the model we're replacing already has those parts integrated in the first model. Here's how the contents of a player.dat file is structured:
Inside the NORM [13], go to each head and hand model (MDLB) and click "Collapse vertices", this button moves all the model's geometry points to the same position, making the model invisible.
If the player model you selected has "Jiggle" models(such as clothing, chains or hair that moves), you can remove those by selecting one and clicking the "empty" button, but using "empty" might cause the game to crash, as the game expects to find those model parts, it's original bone hierarchy and to apply animation or the "jiggle" effect.
So instead of using "empty" we use "collapse vertices" for the hands, head models and jiggle models.
Finally lets get the texture from the original model, copy and pasting within the JSRF Tool won't work for this, because the textures have a unique ID number, so instead we're going to replace the image data through an image editor so the texture ID is preserved as the original.
Load Enemy\Armed.dat, select the texture and click "Edit texture"
Now open Player\Beat.dat and select the second texture and click "Edit texture"
In your image editor, copy the texture of Armed.dat, into the window of Beat's texture, save and then go back to the JSRF Tool with the beat texture selected and click "save changes".
Hey Quick blog post just to let you know I have fixed some bugs in the model importer, for instance before when adding or removing materials from the list in a model, after recompiling it would always reset to the number of materials the original model had, there's some other small bug fixes that I can't remember off the top of my head. 3 May 2020: -fixed and added support for some models that have the materials defined in a different manner, that would cause an ingame crash after importing certain models. -fixed error message when trying to open a texture file with paint.net or Gimp -fixed imported models UVs being inverted or shifted on the V axis.
JSRF is known for its "cell-shaded" style, which is achieved through texture, shading, lighting as well as post-process screen effects.
I believe JSRF uses a technique called lightwarp-shading to shade the models. The lightwarp shades the 3D model with a gradient of different brightnesses and color tones. Here is a similar example of this shading technique as seen in the game Team Fortress 2.
The right side is the lightwarp shading.
TF2 pyro lightwarp texture:
JSRF lightwarp:
This is the JSRF main lightwarp texture, actually the lightwarp in JSRF is stored in (the following) larger texture
file which appears to have more images that are likely used to fake
reflections and/or specular highlights.
To get a better idea of how models are shaded, on the left image I have made the textures of the character Corn almost white, so we can clearly distinguish some parts of the body using a different shading, color and reflectivity.
Here is what Corn's textures for the body and face/hat look like:
Here is another comparison, shaders only (with a white flat texture) vs shaded + texture:
JSRF player models use various materials, to get a better look at the materials in the following picture I have turned the player model into spheres each with a different material.
Shadows
The game uses multiple ways to render shadows: real time shadows, pre-baked shadow volumes, flat 3D meshes as shadows and decal texture shadows. Its unclear and I can only speculate on if the shadow techniques were chosen for performance optimization purposes and/or was an artistic choice, as for instance the level's shadows volumes are simplified, that might have been deliberate to avoid visually noisy shadows that more realistic shadows would cause and/or also a less performance demanding technique to cast shadows.
Let's go through the different types of shadows. Decal casted shadows
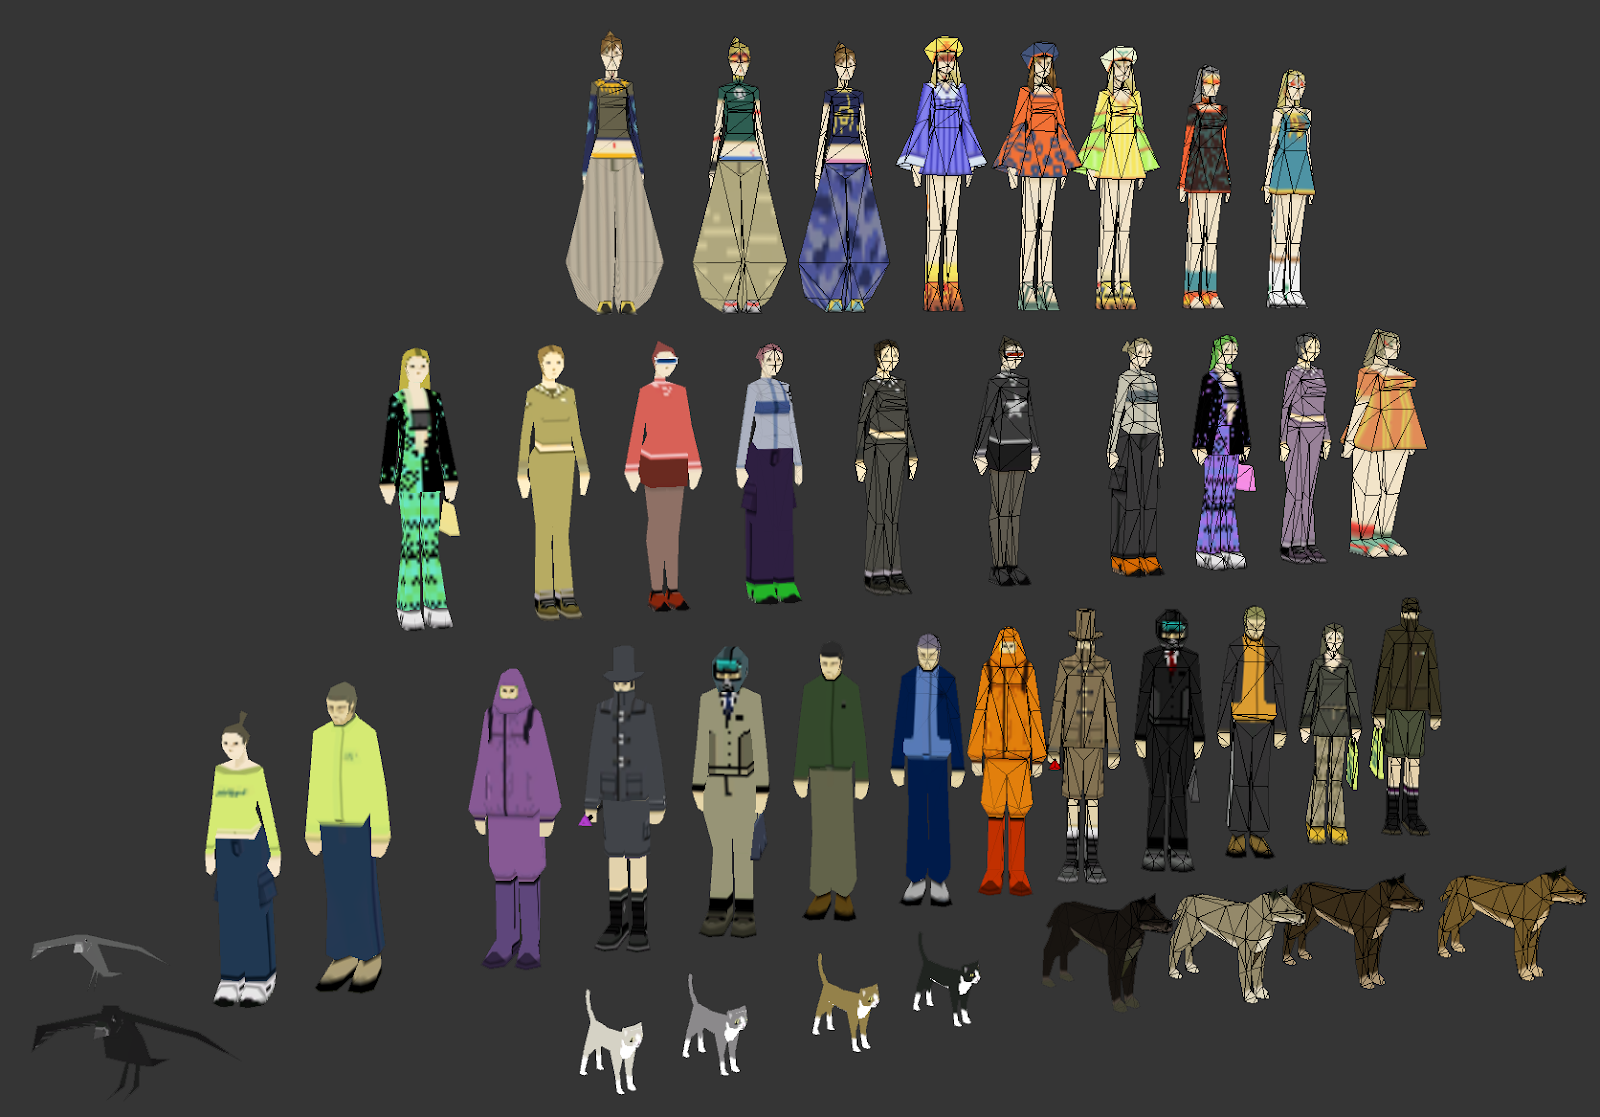
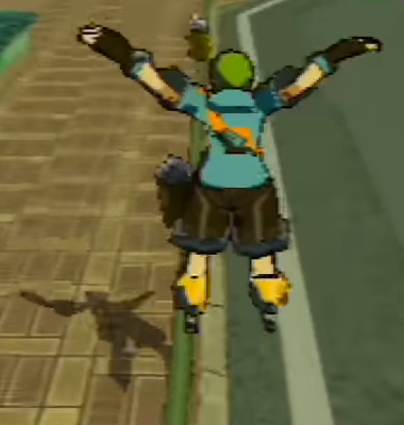
On average the level of detail for pedestrian models are all around 200 triangles per model. The crowds of people in JSRF use a faked decal shadow that is projected over the floor and stretched/oriented depending on the direction of the sunlight and animation, its just a rectangle (using two triangles) with the shadow texture on it and using opacity to blend it with the surface its projected on.
As you can see, the blue texture on the bottom of this picture is what gets projected underneath the pedestrians to fake a shadow, its simple, cheap, elegant and effective. After all there's so many pedestrians in JSRF that using real time shadows would definitely tank the framerate on an original xbox.
Real time shadows
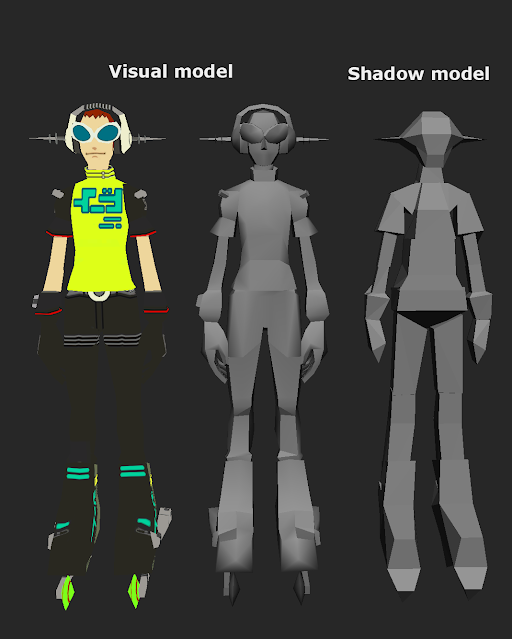
Real time shadows are mainly used on playable characters, important characters models or animated objects. The player's model file contains a simplified version of the visual model that is used to cast the shadow.
There's Yoyo, his shadow is a bit more "blocky" than the visual model, though this is not really noticeable while playing and a nice optimization.
Shadow volume meshes
For the levels, JSRF uses pre-baked aka pre-calculated shadow volumes. The volumes of the shadows are baked into a 3D model that are overlay-ed over the level's visual models and darkens/tints the areas it covers or any moving object that goes inside it.
In the following image you can see the shadow volumes in blue for the garage level, on the top right image I have made the shadow volumes semi transparent so you can get a better idea of how these shadow volumes overlay over the level's visual mesh and darken+tint the areas inside the shadow volume model.
Casting real time shadows for the scenery is most likely too taxing performance wise (at least for the original xbox) so instead it seems the developers decided to use shadow volumes which are far less expensive for the game to run.
Its unclear if the shadow volumes were auto generated, or made manually, or a mix of both, because the shadow volumes seem to have been simplified since they do not contain all the shadows for every object in the level, it's mainly only buildings and medium sized objects that are in the shadow volumes.
Besides the performance/optimization boost by using shadow volumes instead of real time shadows, much of the shadow detail is
simplified with this technique and lends itself to a far less noisy and
more readable environment than if every tiny shadow was cast for the
smaller details.
Well, I think that covers the main things and its only a little glimpse into the many things that make this game a piece of art.
That's it for now, I am sure more could be said about the game as it is full of details I might have glossed over, if so feel free to let me know and I can edit this post or make a second part.
Hey, here's an update for the tool, I have improved the model importing, fixed some bugs, and added support for a model type(player character head models) that are different from the common model setup. For learning the basics on how to use the tool, see this post and also this post It is now possible to import scaled up textures, meaning you can for instance edit a 512x512 texture, scale it up to 1024x1024 in the image editor, save, and then import with "Save changes" in the JSRF ModTool Texture Viewer tab, the tool will import the texture with the new resolution. This will be useful for some of you out there who want to re-create some of the UI textures which are quite pixelated and low resolution and could use an HD remake, looking forward to those mods. The tool maximum texture resolution import is limited to 2048x2048, I haven't tested higher resolutions and really for JSRF I would recommend sticking to 1024 as the maximum in general. And as always, don't forget to clear (delete the files) in the cache, that is the X Y Z, HDD partitions, so the game reloads your modded files.
You can now play JSRF in high resolution with the emulator cxbx-reloaded
The emulator runs JSRF flawlessly, you might need a fairly powerful CPU and/or GPU to run it at a good frame-rate depending on the resolution you chose in the options "Settings > Config Video".
To run at higher resolutions set the "Display resolution" and "Render Resolution" to something higher than the default.
You can download the latest version of cxbx-reloaded by clicking on "Latest Development Build" in this page. I of course own a DVD copy of the original JSRF game (and an original xbox) and so should you if you're going to play on the emulator, as I don't advocate piracy, you'll have to figure out on your own how to get the files of the game to run it on cxbx-reloaded.
You can support the development on cxbx-reloaded here on Patreon as while it may very well run JSRF, there's still lots of work to be done to get other xbox games running and the amazing developers could use our support.
We might not have gotten an official JSRF port, but we have this amazing emulator now, have fun!
For learning the basics on how to use the tool, see this post and also this post While its now possible to import models, keep in mind if you want to do so you will need to have some 3D modelling, uv mapping and rigging skills if you want to make a brand new character and import it.
Therefore this is not going to be a tutorial on how to do 3D modelling as that's a separate gigantic topic, you can find various 3D modelling apps and tutorials online, you might however be able to try doing simple edits on models like changing proportions of the body if you follow this example.
Three new buttons have been added to the top right of the model viewer to import/export models. The JSRF ModTool will export and import models as .SMD model file format. The "Collapse vertices" button will move all the model's points to the origin position (0 0 0) making the model invisible, this can be useful to hide parts of the original model such as the different facial expressions the game switches through as the character is animated. If you don't want to bother making separate models for each facial expression, you can have the body and head model all contained in the first imported MDLB and then you could just make all the other original head models invisible by using the "Collapse vertices" button. As for the tiny buttons "Expt." and "Impt." they let you export or import the selected item(block of data) as a binary file if you want to take a look with a hexadecimal editor to mod some particular data manually.
Anatomy of a JSRF character .dat file
Here's how playable character models are organized in the .dat file
Exporting a model Just select an MDLB item and click "Extract MDL", it will let you select a folder where you want the model to be exported as .smd files, give it a name and click Save.
The tool also exports the lower level parts of the model which have to have the same naming as the main model so when importing the tool can find the lower parts of the model to import as well to rebuild the model properly.
Using Blender (2.79) to edit a model
Since the JSRF ModTool exports the models in .smd file format, for Blender you will need the Source Tools here to import the model(s). Installation instructions for the plugin are on this page. Once the plugin is installed and enabled you should be able to import .smd files by going into the menu File > Import > Source Engine
In this example I am going to make a small edit to the body of Beat, which I exported as "beat_body.smd" First thing you'll notice is you need to rotate the model 90 degrees on the X axis. Also note that the models comes inverted on the X axis, unfortunately I don't have the math/trigonometry etc knowledge and skills to code something so the JSRF Tool would sort these issues,luckily you won't need to turn it front 90 degrees again as the SMD exoprting tool can manage that for you.
Unfortunately with the SMD file format I haven't searched a way to have the models export with its texture(s), so you'll need to export them, select a texture and click "Edit texture", the texture will be extracted in the JSRF ModTool folder "resources\tmp" Then assign the texture(s) manually in blender. Made some edits to the model here:
Since I am barely familiar with blender, I just make some simple edits for demonstration, making his skates tubes ridiculously long and his shoulder spikes longer. Once you are done with your edits, go to the top right panel where you see the list of the objects in the scene, right click on "beat_body_skeleton" and "Selected Hierarchy"
Blender and SMD export settings
Now before exporting we need to setup a few things in the Source Engine export panel.
Click on the third button highlighted by the red circle, to display the Source Engine export panel with which we can export the model back to SMD format.
Under "Source Engine Export" there's a few things to setup.
1-Set the export path, to the folder where you extracted the models (same folder where you extracted with the JSRF Tool)
2-Set the export format to SMD
3-Set the Target Up axis to Y
4-Now click the "Export" button, that's it!
Importing a model on the JSRF ModTool
Go back to the JSRf ModTool and with the original MDLB selected click "Import MDL" Select the first model on the list, in my case "beat_body.smd" and click Open. This window should show up if there are no errors with the model files. The lower level models (p_0 p_1 p_2) should be also loaded automatically if the naming is as on this example.
There are many settings here that you'll most likely never will need to modify but I am going to explain them anyways:
-Vertex definition size: size of the block of data defining a vertex(point) and other properties depending on the size, such as UV, Normals, sekeleton/bone ID, bone deformation factor etc -Global draw distance: distance at which the model disappears (for performance optimization)
Materials
A JSRF player model usually has multiple materials/shaders that define the shading style.
Your model's materials groups should be named "mat_" and the corresponding number you want the material to be.
You can change the color and transparency of the material with the RGBA values, though this might depend on the type of "Material ID", this seems to be mostly used on models for the menus where they used a flat/solid color, and so the RGBA seems to work mainly on materials types dedicated to menu/UI models. Material ID: this defines the type of shading for this material group (mat_0), there are many many more material IDs in other models that will show up as a number since I haven't researched them all to give them a name. Float: this is an unknown parameter, it rarely changes, if you figure out what it does, don't hesitate to post in the comments. You can remove materials by clicking the [x] box on the top right, and add materials from the button on the top right.
Importing
Now that all is setup click "Import", if everything about the model is properly setup it should import without giving any error messages.
Please note that JSRF models are limited to 2 deformers(bones) per vertex
There's the modified model imported, recompiled and ready for the game.
And there it is ingame.
Some info and tips for full custom character mods
You must keep the original bone hierarchy, modifying it or replacing it might cause animations to get messed up or even cause a crash. If you're going to rig a different model, a new model, or ported mesh from some other game, note that you can move the bones around quite a bit(if the proportions differ from the JSRF's original character model) and the game engine will tolerate and will compensate for it anyways, so you can make a character shorter or taller moving bones around. As you might notice, the exported character model's bones do not have a rotation, they are set to 0 0 0, it seems the rotation is completely dependent and applied by the animation data(which I haven't reverse engineered), some animations seem to be shared between characters and they all share the same or very similar rig(bone hierarchy and placement). Well, I think that's more or less all there is to it, if you have any questions don't hesitate to ask in the comments. Cheers